Our Educational Message

Hi, and welcome to our blog. This space is designed to share ideas and methodologies that we use to teach Turkish teenagers. In particular, there is a strong focus on ICT-ELT, which means if you like visual and technological support for your style of teaching, this blog is for you. My colleague, Brentson Ramsey, has been working alongside me for three years. He is also a big proponent of the ICT-ELT Paradigm, which means he will also be posting from his own teaching perspective on the blog.

2010 was the beginning of this new journey, and although there is no definitive ICT-ELT road map available for everyone to follow, it is exciting to explore the technological means to make teaching more fun and affective for students. Our main message is for teachers to ADOPT & ADAPT the paradigm shift for their own needs, and remember that
ICT-ELT is a TOOL, NOT a SOLUTION.

Wednesday, 26 December 2012

UNCOVERING your OWN LESSONS, by short-cuts?

Many teachers complain about not having time to do anything else other than teaching, preparing lessons, making materials and marking papers.  Although I totally concur that this is the case for the most part, I believe that my colleague and I have found a couple of ways that can speed up the process and make cutting corners a positive way to approach your teaching.  The addition of ICT in our ELT/ESL syllabus has indeed helped us to reduce our workload on many levels; however, it hasn't always been that way.  In order for us to be in this place where we find ourselves with time to spare is because we have been putting the work up to now.  It is not an easy process, but after 18 months of really hard slog, we believe we can now sit back and reap the benefits of the time commitment (well for some of the time at least) to our syllabus and lesson planning.  That does not mean the work is finished, but what it does mean is that we can step back from the coal face and decide on the most appropriate courses of action for everything we want to do with our students and curriculum.  The TWO main reasons for this wonderful feeling are UbD (see my previous post) and COMMONCURRICULUM.

This recently set-up website is a breath of fresh air for busy teachers.  Its sole purpose for the moment is to give teachers an on-line platform for them to record and organize their lesson plans and syllabus for days, weeks and months of the year.  It is such a quirky and cool interface that it is impossible not to fall in love with it immediately.  Here is a video that introduces is.  I will follow it with examples from our own yearly plan that we have found so refreshing to write up and complete in a relatively short time to what it normally takes to do.We have both sat down and written up our syllabus since day one this year. This means that when we come back in August, 2013, we will be ready to start the year without worrying too much about what we have to do. Of course we will have some tweaking to do, but the fundamental framework is now in place. 
 

Here is a snippet of our WEEK ONE.

You can see that the organizational model is nothing new with DAILY LESSONS outlined with places for writing up your plan.  However, what makes this ICT on-line version so exciting is that you can upload files, documents, links to this blog (hahaha), links to anywhere including Dropbox and any cloud, pictures and video for any teacher in the year group to access.  This would be particularly helpful for cover lessons.

 Here is a snippet of our WEEK TEN.
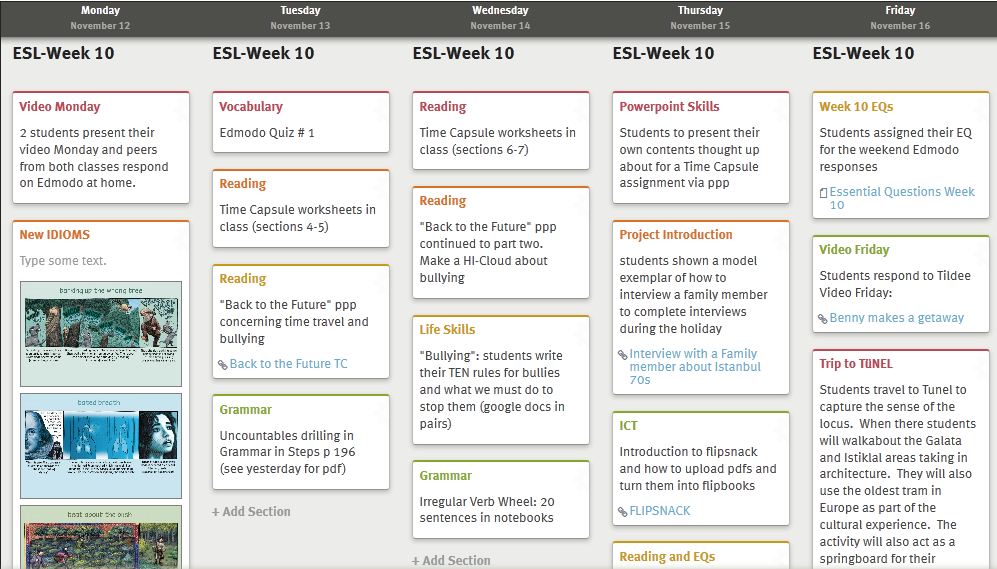

This snippet from the middle of our semester highlights how accessible our program is for us and anyone, for instance our coordinator and HoD, to over look and approve.  You can also see that we have uploaded our weekly idioms which stand out for the week.  If you find that you didn't use a particular lesson outline one day, it is easy to slide it over to the following day so that it can be picked up and taught.


 Here is a snippet of our WEEK SIXTEEN.


SUMMING UP...
Although I have blown the trumpet of this awesome looking platform for curriculum design and planning, we are still in the early stages of how it best helps us.  For three weeks we have felt a real sense of organized lessons as a result of getting them all uploaded.  However, as with everything, the proof of any pudding is in the eating.  This we plan to do over the next semester and see how really affective and effective it turns out.  In addition we plan to link it to our standards that are on our Atlas Rubicon in the school system.  Once this has been further integrated, we will have a further measure as to how brilliant it is.  But for now, we are very pleased.


Monday, 17 December 2012

Make Your PowerPoint Stand Out with 500px

If you are like my colleague and I, you probably use PowerPoint on the nearly daily basis in and out of school. We use it to introduce and explain major grammar points, talk about the major themes in a novel, or to give professional development workshops outside of school. Because of this, we are always looking for new and innovative ways to give our presentations that 'Wow' factor. In a previous post on this blog, my colleague, David, introduced several strategies on how to not only make a high-quality PowerPoint, but also how to present like a trained professional. This post is a short extension of that, so I highly recommend checking out David's post before continuing on. Just click here.

So, now that you have the essential presentation skills in mind, I am going to show you another tip to help make your slides stand out.  More specifically, I will explain how you can add visually eye-popping pictures that will certainly get your audience's attention. Typically, most people, myself included, get the majority of pictures for their presentations from Google Images. Without doubt, with some searching, you can find some striking pictures. The problem, however, is that many of them can be quite small, so when you enlarge them in a PowerPoint, they can look rather blurry. Even worse, I have seen some colleagues include images in their presentations that have a copyright logo on the top of them.

Thus, without further ado, let me introduce you to 500px.  This is a free app from the Apple Store as well as the Google Play Store.  In a nutshell, 500px is an app that has a large collection of extremely high resolution images. For example, when you download an image from Google Images, it normally has a resolution of 100 to 200 kbs, sometimes even less. With 500px, however, images are very likely to be more than 2 mbs. That means that these images are at least 20-30 times sharper and crisper than a typical image on Google Images. The reason for this is because these images have been taken by professional photographers or others with brilliant cameras. Granted, pictures from 500px will take up more space in your hard drive and will make your PowerPoint presentations much larger in terms of space, but the results are so worth it. Both my colleague and I have been asked after giving professional development sessions where we got the images that we used. The audience had simply never seen such high quality images being used in PowerPoint.

500px, being an app, is extremely easy to navigate. When you open it, it shows the most popular 500 pics of the day, hence the name of the app. Simply scroll the page to the right to keep checking out the most recent pictures.  Plus, hundreds are being uploaded everyday. There is also a search function if you are looking for a specific kind of picture. Fair enough, you will not find nearly the amount of images that you can on Google. Nonetheless, the effect you will have on your students or colleagues is worth it.

Just to give you an idea, here are some pictures from 500px that I have used recently in a PowerPoint presentation.


Sunday, 16 December 2012

SESSION THREE: PD in NORTHERN CYPRUS

Session THREE is the PD session which involved explaining the serious educational brilliance of our PLN, EDMODO.  Since both my colleague and I have written previously on Edmodo, I will simply put a link below for you to click and see what we have written, before. Can I just add that by using Edmodo we put the onus on students and parents to take more interest in their learning both in and out of class.  It has many advantages over traditional systems.
My PD session attendees were very taken with the site and its services.  They were particularly excited about the host of quiz styles available at literally the push of three buttons. Also, when I showed them the grading book for recording their students' progress, this also created a lot of interest.  It was a really positive 90 mins. on Edmodo PD.


Thursday, 13 December 2012

SESSION TWO: PD in NORTHERN CYPRUS

FIVE PD SESSIONS in a ROW, AM I CRAZY?


This session had the most enthusiastic returns over the two days. I know why. It is because with UbD (Understanding By Design) you can seriously start to become a genuine stake-holder in your teaching process, and that includes the syllabus.  By using UbD you can become a complete teacher in terms of creativity, organization, structure and follow through of the product you are trying to deliver.In addition, you really get to the bottom of what it is you want your students to learn & understand.
The UbD model, developed by Wiggins and McTyge has become really popular in many countries over the past few years. I strongly believe It is because of the totally inclusive-teacher-in-the-process model that it promotes.  From the very first step into the process teachers are so aware that is their input that what matters when it comes to uncovering the syllabus for better coverage for all students.  Teachers are expected to develop a syllabus and framework that aims to properly cover all aspects of the expected outcomes from initial Transfer of Learning in section one to Activities intended for students in section three.
This is the followed by Student Understandings and Essential Questions.  These two sections are for me the nuts and bolts of successful knowledge transfer and understandings for your students. Before I made the switch to this model, I would often wonder how much students knew after or even during a unit.  Now that the framework has become an integral part of my syllabus planning, that I cannot believe I didn't use it before. It is plain common sense. To cut the long explanation, which I leave to the original text, the Student Understandings is a brilliant transparent section where we record explicit expectations of what we believe students will get clear in their heads by the end of the unit. 

The Essential Questions section is for you to add springboard questions to get students to critically think and self-reflect on the content therein.  There is a serious need for personalization of the topic here after some general scaffolding has been done with surface to middle order type questions. The crux of the matter is to make sure students realize how important critical thinking and personalization are for their own learning phase.

The next stage is for What students will know, and What students will be skilled in. This has very important connotations with what we do as teachers, and what students have at their disposal thanks to UbD.  Any unit we present to students has to have a purpose with genuine learning outcomes.  Not only that, but students have to go through a process that involves knowledge acquisition and skills-based instruction that will allow them to leave any one unit, and feel that they have genuinely learned something they can feel confident about to discuss with their peers or other teachers.

Next is the assessment and how each part of the unit is looked at as progress, whether formative or summative.  This needs teachers to focus on how they will assess the work they have assigned and students have produced.  It is necessary to correlate what has gone on in and out of the classroom to give a genuine assessment of the students.  This is why it is important to make explicit the measures in place from quizzes, daily aural assessment and various activities, which are recorded here.


Finally, the activities both in and out of classroom, are stated here for everyone to see.  What is important to realize as you read this is how back to front it all seems. Many teachers are really confused by this part of the model of UbD at first.  But if they step back, they can see that varied activities, although hugely important, should not be the primary concern when constructing a unit.  In fact, if we as teachers consider the UNCOVERING of the Syllabus as opposed to just COVERING it, we could have so much more personal gratification first; but more importantly students will be coming back and asking for more.  We need to really work on what the PURPOSE is of the unit, and then how we can achieve the aims, objectives and learning outcomes as a continuous process within the unit.


This paraphrase and summary of the brilliant UbD model, does not do it real service and I recommend you order the book immediately from Amazon.  But, as a short blog post, I feel that you can get a flavor of UbD for your syllabus.  If you want to learn more, first buy the book, check out the internet for other sites and gather as much information as you can.  If the reaction of my Cypriot teaching colleagues during this session is anything to go by, it really is something to take more interest in outwith this blog post.  You can also contact me direct by email and ask for more information on how it works in my context and as a student-centered model for better understanding syllabus.

SESSION THREE on TILDEE VIDEO TUTORIALS to follow very soon...

Wednesday, 12 December 2012

SESSION ONE: PD in NORTHERN CYPRUS

FIVE PD SESSIONS in a ROW, AM I CRAZY?

I asked myself the title's question in Ercan Airport,  Northern Cyprus, while waiting for my flight home to Istanbul. The answer, and subsequent blogpost, is categorically, NO!

The reason I come to that conclusion is quite simple: dedicated and motivated teachers, who not only inspired me to keep energetic and positive, but showed me some improvements to my syllabus design unit simply by participating and sharing their collaborative knowledge. For this post I would like to share the main subject areas I covered as a reminder to anyone who thinks professional development training is easy, but to also add that if you have a good audience and participatory group of teachers it really is fabulously enjoyable.  


This is one of my favorite sessions in any PD and I have posted about it before. therefore I won't dwell on it too long, other than say, no matter who I present my ideology and methodology for student awareness to in this context, I get amazing participation and feedback.  Allow me to elaborate, yet still paraphrase. If you want the full version I recommend you click on this link FIVE STAGES of LEARNING.

The basic premise is related to the five stages of grief, and it is 100% a metaphorical reference, as I feel no near death or post death feelings related to learning of any kind. On the contrary, my excitement about professional development(learning for teachers) and learning in schools that we partake in, is without exception the most exciting and rewarding profession on the planet. So without anymore testimony and waffle, I give you:

Many young students of English in Turkey tend to be rather disdainful of the learning of the lingua franca, many many more do not. However, it is quite common for students to go through anti-English phases through out their young lives.  This stage recognizes this fact and it is very real. An example of denial in Turkish student phraseology (translated) would be:

"I am Turkish, why do I need to learn English?"
In fact, even the most nationalistic can not ignore the influence of English around the world, and if students in this day and age want to expand, go or even study overseas should realize that, in fact, English is helpful not a hindrance.

Young people are angry, we all know that. And believe you me, Turkish students can get vey angry when they have to learn English. Even when working in English-medium institutions I have witnessed and experienced many angry young students who fail to grasp that we are trying to help them.  A typical angry retort could be:
"I hate English! It is such a stupid language. I won't do it."


This stage is where things start to change in the students' behavior. They are still lying to themselves, but it is no longer an aggression or confrontational issue. Therefore, they try to make amends for their previous stages by offering the chance to themselves that will do something, albeit half-heartedly, but it is never enough. So, they fail in their endeavors again. A typical response at this stage could be:
"If I do this quiz tonight, at least I have done some studying for the exam, right?"

Now the reality kicks in, but before recovery they have to feel this pain. Of course it can manifest in people in so many ways, but what I have seen is genuine depression. The students feel isolated, left behind and in need of major help. It is this time we need to be ready as teachers to step in and really give advice, support and empathy. A typical feeling could be:
"Yaaa, I am such a loser. I have not even tried. I am disappointed with myself."


So when students of a  FIVE STAGES VARIETY reach here, and to where their peers have been on average for about four months, they do feel isolated. But, because they have the strength within, they can deal with it better. Of course, it is important that we as their teachers respect the stages and make efforts to support and help the now.  They need encouragement, without pandering, and they need to be recognized as making a genuine effort to improve on their learning curve. A quality response could be:
"I know I have been foolish, but now I plan to be honest with myself and move forward. When I get assignments, homework or just time to revise, I will use the time effectively and make a difference to my self."

THESE are the FIVE STAGES of learning. In fact, I had planned to do the other four sessions in this post too, but I believe it will be too long. Thus, I will leave you with this and keep you waiting for session two PD in CYPRUS: UbD for Newcomers.

Monday, 10 December 2012

Google Docs for Presentations

In the two previous posts on Google Docs that can be found on this blog, I have focused on how it can improve collaboration between colleagues as well as between teachers and students. In brief, Google Docs allows you to instantly share documents with whomever you wish. As it automatically generates and sends the link to the people you choose, it removes the downloading and attaching documents to an e-mail paradigm. We typically take this for granted because we are used to it. For the past several years, e-mailing documents back and forth to a colleague or student was the most efficient method, but it no longer is. Moreover, with Google Docs, two or more people can work on a document at the same time from anywhere. This makes it incredibly useful for doing group projects in and out of the classroom. Students no longer have to wait for their peers to finish and e-mail their part of the assignment. They can see what their group mates are doing, or more likely not doing, in real time. 

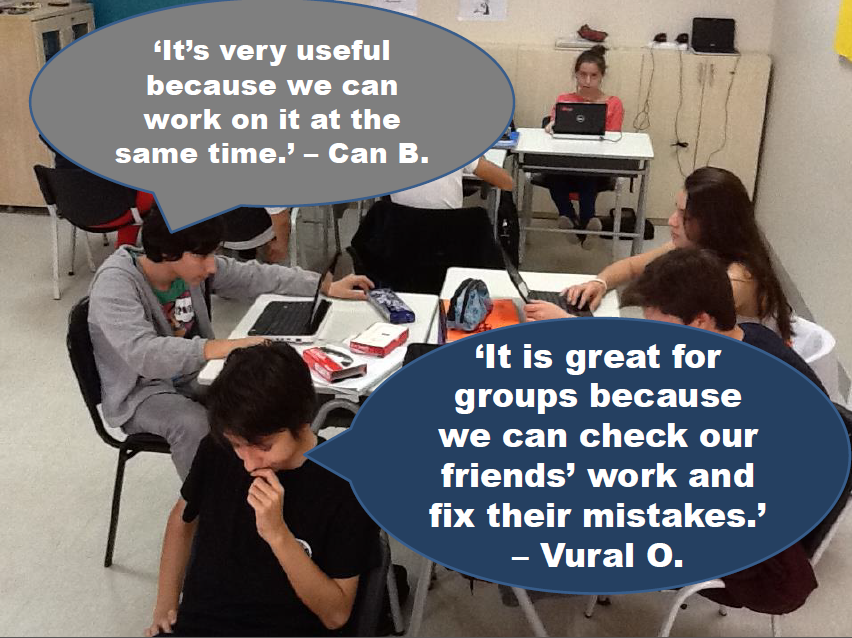
We have used Google Docs on several projects now this year, and the students have really taken to it. One of our students, Vural, said that he enjoys working with Google Docs because he can see and fix his group mates' mistakes from his own computer. Another student, Can, remarked that it is useful because the students can work on a document at the same time.

Furthermore, I made a short survey about Google Docs that our students have recently filled out. It could be stated that perhaps our students are afraid to tell us if they don't like working with it because it will hurt our feelings, but I truly believe that they are honest on these surveys. Nonetheless, here are some of the results of the survey on Google Docs, and you will find that they are extremely positive.  What we found really beneficial from the survey is that the students found it easy-to-use, and most of them either gave or received help from their peers on the couple of assignments that we have done thus far this year.


With of all that in mind, imagine if could create a PowerPoint presentation in the cloud that could be instantly shared and edited in real time by your colleagues or students just like the docs mentioned above? Does it sound too good to be true? It isn't. With Google Docs, you can! With a free Google account, simply log into Google Drive. Once there, you will see a large Create button on the left-hand side of the page. Click that, choose presentation, and Bob's your uncle, you now have a presentation in the cloud that can be shared instantly without the need to e-mail. This makes it a wonderful tool for creating group presentations!

Our Example


Most recently, we have used Google presentations as an activity to complete a grammar unit. We had been teaching comparative and superlatives for several lessons. We completed exercises on the IWB and their grammar books, but then we wanted the students to produce something on their own. Production is the key.  That is when you can observe if your students have truly understood any give grammar point.  If they are able to produce something meaningful on their own and in the correct context, you can be confident that they have got it.

We decided on creating one Google presentation for the whole class, where each student was responsible for creating two slides with a picture and a sentence or two using a comparative or superlatives about the item or person in the picture. We left it totally up to them. They could write something about their favorite celebrity, sports star, technological gadget, just to name a few.


Here are a couple of slides that our students produced.  You will see that the first picture shown here has also included a widely-used idiom, barking up the wrong tree.  Believe it or not, we spend 20-30 minutes each week teaching our students four new idioms.  Many educators in ELT can't believe that we do this and, even more so, that our students actually know what they mean and use them from time to time.  We have been teaching the most popular idioms in English for two years now, and we have had much success with them.

To do this activity, all I had to do was to create a new presentation on Google Docs. I made the title slide with a recent picture of the students, and then followed that by making two blank slides for each student.  Just to avoid confusion, I typed their names at the top of each slide.  Finally, I shared the presentation with all of our students by simply clicking the share button and adding their e-mail address in the box provided.  After that, every student was able to work on the same presentation at the same time.

The Eureka Moment

One of the biggest advantages of using Google Docs is the fantastic opportunity and ease of peer review. Every student has the ability to look at what his or her classmates are doing from their own computer.  We had planned to tell the students to peer review once everyone had finished, but before I even had the chance to tell them, one of our students, Melisa, told her classmate, Berk, that he had made a mistake on his slide!  It was an unbelievable moment as a teacher because that means that she began to look at the others' slides without me even prompting her.  It was a tiny moment in the larger scheme of things, but it proved to me that Google Docs can be an excellent tool to use for group work in the ELT classroom.